


Android App Development-Controls Part One: Introduction to UI in Android and Text Controls
Layouts in Android are constructed from two objects: View and ViewGroup.
The View class is the base class for many widgets sub classes such as TextView and Button classes.
The ViewGroup is a view that conatains other views. The Viewgroup class is the base class for many layouts in Android.
The UI Hierarchy is described in this image from the Android SDK documentation:
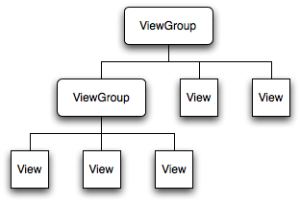
As you can see the root node is a view group which can be any layout that contains child views or even other viewgroups.
The root node appears on the activity by calling setContentView method in the activitiy’s onCreate method. Which in turn draws its child nodes and each child node draws its child nodes.
In the this series we are going to explore the categories of android widgets including:
- Text Controls
- Button controls
- Selection controls
- Pickers.
- Menus.
- Dialogs
- other controls
Text Controls:
Text controls include:
- TextView.
- EditText.
- AutoCompleteEditText.
- MultiCompleteTextView.
TextView:
The TextView represents non-editable text. It resembles the Label control in C# or ASP.NET but it has an interesting feature which is the ability to highlight the text if it is a URL, an e-mail or a phone number so that when the user clicks on the textview the default intent whether it is the web browser or the dialer launches:
<?xml version="1.0" encoding="utf-8"?>
<LinearLayout xmlns:android="https://schemas.android.com/apk/res/android"
    android:orientation="vertical"
    android:layout_width="fill_parent"
    android:layout_height="fill_parent"
    >
<TextView
    android:layout_width="fill_parent"
    android:layout_height="wrap_content"
    android:text="Visit Http://www.android-pro.blogspot.com"
    android:autoLink="web"
    android:id="@+id/txtURL"
    />

    <TextView
    android:layout_width="fill_parent"
    android:layout_height="wrap_content"
    android:text="Dial 1 650-253-0000"
    android:autoLink="all"
    />
</LinearLayout>
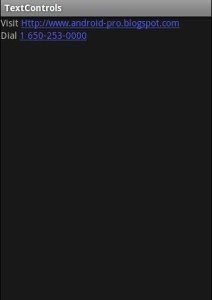
You can see that the TextViews containing URLs or Phone numbers are highlighted, and when the user presses on them the default intent, the browser or the dialer launches. This is done by using the property android:autoLink which can have the values:
web, email ,phone, map, All
This can be achieved from code by using the following code:
TextView txtURL=(TextView)findViewById(R.id.txtURL);
Linkify.addLinks(txtURL, Linkify.ALL);
Edit Text:
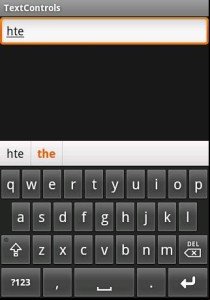
The EditText is a subclass of the TextView it is like the TextBox in C#. it enables users to edit text and offers interesting features like Text correction, capitalizing letters and password text.
We set and get the text of EditText programmatically using setText(String text) and getText() methods
We can use the autoText property to make the EditText to correct the common spelling mistakes.
<?xml version="1.0" encoding="utf-8"?>
<LinearLayout xmlns:android="https://schemas.android.com/apk/res/android"
    android:orientation="vertical"
    android:layout_width="fill_parent"
    android:layout_height="fill_parent"
    >
<EditText
android:layout_width="fill_parent"
android:layout_height="wrap_content"
android:autoText="true"

/>
</LinearLayout>
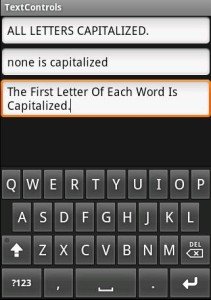
We can use the capitalize property to make the text capitalized like this:
<LinearLayout xmlns:android="https://schemas.android.com/apk/res/android"
    android:orientation="vertical"
    android:layout_width="fill_parent"
    android:layout_height="fill_parent"
    >

<EditText
android:layout_width="fill_parent"
android:layout_height="wrap_content"
android:capitalize="characters"

/>
<EditText
android:layout_width="fill_parent"
android:layout_height="wrap_content"
android:capitalize="none"
/>
<EditText
android:layout_width="fill_parent"
android:layout_height="wrap_content"
android:capitalize="words"
/>
</LinearLayout>
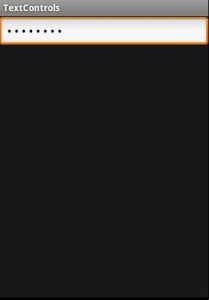
We can use the password property to make the control accepts phone numbers as input:
<?xml version="1.0" encoding="utf-8"?>
<LinearLayout xmlns:android="https://schemas.android.com/apk/res/android"
    android:orientation="vertical"
    android:layout_width="fill_parent"
    android:layout_height="fill_parent"
    >

<EditText
android:layout_width="fill_parent"
android:layout_height="wrap_content"
android:password="true"

/>

</LinearLayout>
We can enforce the Control to wrap all the text in a single line by setting android:singleLine property to true.
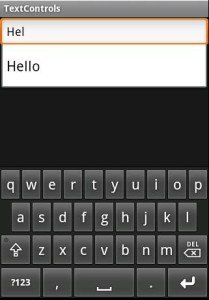
AutoCompleteTextView:
The AutoCompleteTextView is an EditText with auto complete functionality. The auto complete functionality can be achieved by attaching an Adapter with the auto complete values to the control like this:
<?xml version="1.0" encoding="utf-8"?>
<LinearLayout xmlns:android="https://schemas.android.com/apk/res/android"
    android:orientation="vertical"
    android:layout_width="fill_parent"
    android:layout_height="fill_parent"
    >

<AutoCompleteTextView
android:layout_width="fill_parent"
android:layout_height="wrap_content"
android:id="@+id/act"

/>

</LinearLayout>
Then attach the adapter from the code like this:
AutoCompleteTextView act=(AutoCompleteTextView)findViewById(R.id.act);
        ArrayAdapter arr=new ArrayAdapter(this,android.R.layout.simple_dropdown_item_1line,new String []{"Hello","Hi","Alloha"});
        act.setAdapter(arr);
The Adapter object is used to determine the way data can be represented (viewed) in controls. In a search program you can obtain the auto complete words from a web service and populate the adapter with these words.
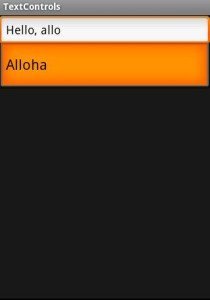
MultiAutoCompleteTextView:
The AutoCompleteTextView can suggest auto complete for the entire text in the control, meaning that if you type more than one word it would try to match the whole sentence not the single words.
The MultiAutoCompleteTextView works the same way as the AutoCompleteTextView except that it can suggest words for each word in the sentence you type. you add a Tokenizer that parses the text and allows you to suggest where to start suggesting words like this:
<?xml version="1.0" encoding="utf-8"?>
<LinearLayout xmlns:android="https://schemas.android.com/apk/res/android"
    android:orientation="vertical"
    android:layout_width="fill_parent"
    android:layout_height="fill_parent"
    >

<MultiAutoCompleteTextView
android:layout_width="fill_parent"
android:layout_height="wrap_content"
android:id="@+id/act"

/>

</LinearLayout>
MultiAutoCompleteTextView mact=(MultiAutoCompleteTextView)findViewById(R.id.act);
        ArrayAdapter arr=new ArrayAdapter(this,android.R.layout.simple_dropdown_item_1line,new String []{"Hello","Hi","Alloha"});
        mact.setAdapter(arr);
        mact.setTokenizer(new MultiAutoCompleteTextView.CommaTokenizer());
The tokenizer tells the control to start suggesting words separated by a comma.
If you have any questions on this tutorial please ask them in the comments. We will cover Part Two of Development Controls next week.
 android