


Android App Development – Layouts Part One: Linear and Relative Layouts
The way we construct the user interface in Android is pretty interesting. You can construct the UI widgets programmatically. But Android presents a decent way to construct the UI which is XML-based layouts.
The layout of an activity can be constructed by a XML file. These files are considered resources as they reside in res/layout folder. Each xml file consists of the declarations of widgets and their containers. The xml file is constructed in a hierarchical way, there is a tag that defines the layout of the widgets, inside this tag there are nested xml tags that define widgets, each widget tag has attributes that define the widget’s properties.
take a look at a simple layout xml file called main.xml which resides in res/layout directory:
<?xml version="1.0" encoding="utf-8"?>
<LinearLayout xmlns:android="https://schemas.android.com/apk/res/android"
    android:orientation="vertical"
    android:layout_width="fill_parent"
    android:layout_height="fill_parent"
    >
<TextView
    android:layout_width="fill_parent"
    android:layout_height="wrap_content"
    android:text="@string/hello"
    />
    <Button
    android:layout_width="wrap_content"
    android:layout_height="wrap_content"
    android:text="launch Activity 2"
    android:id="@+id/btnLaunch"
    />

</LinearLayout>
This layout defines a TextView and a button. The root xml node is <LinearLayout> node which defines the layout of all controls inside it.
We use the following code to construct the UI based on this xml definition.
setContentView(R.layout.main);
Also the TextView node contains attributes like :layout_width which can have the values fill_parent which denotes the the width of the control should occupy all the available width, also it could have the value wrap_content which denotes the control should occupy only width according to the width of its content which is the text inside the textView
The Button node has an extra attribute which is the android:id attribute, why this attribute is used in the button and not used in the TextView? The answer is that the TextView represents a label (just a static text to display) so there is no need to give it an id cause we will not reference it in the code, however if we need to display dynamic text in the TextView we can give it an id
To reference a control from the code we do it like this:
Button btnLaunch;

btnLaunch=(Button)findViewById(R.id.btnLaunch);
notice that the android:id attribute should be in the format of @+id/Control’sID as shown above, if you write it like android:id=”btnLaunch” the IDE would denote an error and you won’t be able to reference the control from the code.
Why to use XML-layouts and when to construct the layout programmatically ?
- Using xml layouts achieves separation between the interface and the application logic, instead of writing a bulk of code that constructs the UI, defining it as XML is easier and less confusing.
- You can save using code for constructing more complicated UI such as populating check-box columns in a grid.
- It is a trend to construct the UI with XML definitions like in Microsoft’s XAML or even HTML, so people who are familiar with technologies like these would find it easy to deal with Android.
Finally we’re going to explain in more details all about Android different layouts
We have many layout forms:
- Linear layout: manages controls in horizontal or vertical way.
- Table layout: manages the controls in a group of columns and rows.
- Relative layout: manages the controls relative to one another or to the parent.
- Absolute layout: manages the controls in absolute position by coordinates.
- Frame layout: manages the controls in a dynamic way.
- Scroll view: manages the controls in a scrollable layout.
Linear layout:
Linear layout is like a box that contains controls inside it. Controls are drawn one after each other either horizontally or vertically according to the Orientation of the layout.
When dealing with Linear layout there are five properties that we can deal with:
- Orientation.
- Fill model.
- Weight.
- Gravity.
- Padding.
Orientation:
Orientation property determines whether the controls would be put in a horizontal way like in a row or in a vertical way like a column. The layout orientation is to set the property android:orientation.
vertical Orientation:
<?xml version="1.0" encoding="utf-8"?>
<LinearLayout xmlns:android="https://schemas.android.com/apk/res/android"
    android:orientation="vertical"
    android:layout_width="fill_parent"
    android:layout_height="fill_parent"
    >
<TextView
    android:layout_width="fill_parent"
    android:layout_height="wrap_content"
    android:text="Linear Layout"
    />
    <Button
    android:layout_width="fill_parent"
    android:layout_height="wrap_content"
    android:text="this is a button 1"

    />
    <Button
    android:layout_width="fill_parent"
    android:layout_height="wrap_content"
    android:text="this is a button 2"
    />
</LinearLayout>

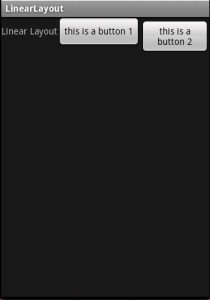
Horizontal Orientation:
<?xml version="1.0" encoding="utf-8"?>
<LinearLayout xmlns:android="https://schemas.android.com/apk/res/android"
    android:orientation="horizontal"
    android:layout_width="fill_parent"
    android:layout_height="fill_parent"
    >
<TextView
    android:layout_width="fill_parent"
    android:layout_height="wrap_content"
    android:text="Linear Layout"
    />
    <Button
    android:layout_width="fill_parent"
    android:layout_height="wrap_content"
    android:text="this is a button 1"

    />
    <Button
    android:layout_width="fill_parent"
    android:layout_height="wrap_content"
    android:text="this is a button 2"

    />
</LinearLayout>
If you want to set the orientation programmatically you can use this code:
.widget.LinearLayout mainLayout=new LinearLayout(this);
        mainLayout.setOrientation(LinearLayout.VERTICAL);
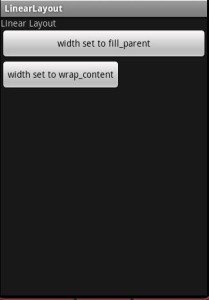
Fill Model:
The widgets inside linear layout have width and height properties. These properties can have three values:
- A numeric value in pixels or inches that gives the width or height properties an absolute value.
- They can have the value wrap_content meaning the widget should occupy it’s natural size unless there is no space then android can use word wrap to make the widget fit.
- They can have the value fill_parent meaning the widget should occupy all the available space of the closing container.
To set the fill model programmitaclly use this code:
Button b=(Button)findViewById(R.id.btn);
        b.setWidth(LayoutParams.WRAP_CONTENT);
        b.setHeight(LayoutParams.FILL_PARENT);
This is an example to two buttons one with width set to fill_parent and the other set to fill_parent:
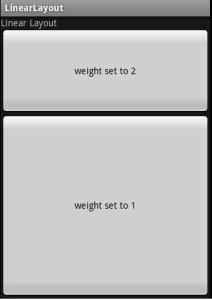
Weight:
The weight property determines the ratio by which controls share free space. For example if we have two buttons and the weight of both is set to 1 (this is the default value) then the free space will be divided equally between them.
But if the value of the weight of one of them is 2 and the other is one, then the first button will occupy space half as that occupied by the second and so on.
<?xml version="1.0" encoding="utf-8"?>
<LinearLayout xmlns:android="https://schemas.android.com/apk/res/android"
    android:orientation="vertical"
    android:layout_width="fill_parent"
    android:layout_height="fill_parent"
    android:id="@+id/mainlayout"
    >
<TextView
    android:layout_width="wrap_content"
    android:layout_height="wrap_content"
    android:text="Linear Layout"
    />
    <Button
    android:layout_width="fill_parent"
    android:layout_height="fill_parent"
    android:text="weight set to 2"
    android:layout_weight="1"

    />
    <Button
    android:layout_width="fill_parent"
    android:layout_height="fill_parent"
    android:text="weight set to 1"
    android:layout_weight="1"
    android:id="@+id/btn"
    />
</LinearLayout>
To set the weight of a widget programmatically it’s a little bit different, we use this code:
Button b=(Button)findViewById(R.id.btn);
        LayoutParams params=new android.widget.LinearLayout.LayoutParams(android.widget.LinearLayout.LayoutParams.FILL_PARENT,android.widget.LinearLayout.LayoutParams.FILL_PARENT,3);
        b.setLayoutParams(params);
the widget does not have a method to set the weight directly, instead you define
LayoutParams params=new android.widget.LinearLayout.LayoutParams
object and use the widget.setLayoutParams(params) method.
The LayoutParams class has many constructors including this one:
public LinearLayout.LayoutParams (int width, int height, float weight)
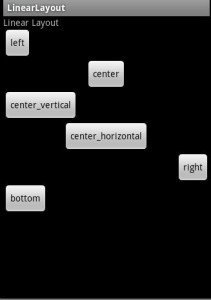
Gravity:
By default widget are positioned in the top-left of the screen, but if you want to change this you can use the layout_gravity property:
<?xml version="1.0" encoding="utf-8"?>
<LinearLayout xmlns:android="https://schemas.android.com/apk/res/android"
    android:orientation="vertical"
    android:layout_width="fill_parent"
    android:layout_height="fill_parent"
    android:id="@+id/mainlayout"
    >
<TextView
    android:layout_width="wrap_content"
    android:layout_height="wrap_content"
    android:text="Linear Layout"
    />
    <Button
    android:layout_width="wrap_content"
    android:layout_height="wrap_content"
    android:text="left"
    android:layout_gravity="left"

    />
    <Button
    android:layout_width="wrap_content"
    android:layout_height="wrap_content"
    android:text="center"
    android:layout_gravity="center"

    />
    <Button
    android:layout_width="wrap_content"
    android:layout_height="wrap_content"
    android:text="center_vertical"
    android:layout_gravity="center_vertical"

    />

    <Button
    android:layout_width="wrap_content"
    android:layout_height="wrap_content"
    android:text="center_horizontal"
    android:layout_gravity="center_horizontal"

    />
    <Button
    android:layout_width="wrap_content"
    android:layout_height="wrap_content"
    android:text="right"
    android:layout_gravity="right"

    />

    <Button
    android:layout_width="wrap_content"
    android:layout_height="wrap_content"
    android:text="bottom"
    android:layout_gravity="bottom"

    />

</LinearLayout>
Some additional gravity properties include:
The layout gravity properties fill_vertical and fill_horizontal expand the size of the control horizontally or vertically if needed so that they fill the container.
If we used fill it will stretch from both files.
Difference between android:layout_gravity and android:gravity:
The android:layout_gravity sets the position of the view in the container, while android:gravity sets the position of the content of the view.
For example if the android:layout_gravity=”right” then the view would be placed in the right position in the container while if the view’s android:gravity=”right” then the text of the view would be placed at the right.

To set the android:gravity property programmatically you can use this code:
Button btn=(Button)findViewById(R.id.btn);
        btn.setGravity(Gravity.RIGHT);
Padding:
The android:padding property sets the padding between widgets. if you specify the padding property to the container then the container with all of its widgets would be shifted by the value, if you specify it to a single widget then the contents of that widget would be shifted by the specified value
If you use the android:padding property then this would apply the padding values to the four edges of the widget. If you need to be more specific you can use:
android:paddingTop or android:paddingLeft or android:paddingRight or android:paddingBottom
<?xml version="1.0" encoding="utf-8"?>
<LinearLayout xmlns:android="https://schemas.android.com/apk/res/android"
    android:orientation="horizontal"
    android:layout_width="fill_parent"
    android:layout_height="fill_parent"
    android:id="@+id/mainlayout"
    android:paddingLeft="20px"
    >

    <Button
    android:layout_width="wrap_content"
    android:layout_height="wrap_content"
    android:text="button 1"
    />

    <Button
    android:layout_width="wrap_content"
    android:layout_height="wrap_content"
    android:text="button 2"
    android:paddingLeft="40px"
    android:id="@+id/btn"
    />

</LinearLayout>

Relative layout:
Relative layout lays out widgets based on their position relative to each other. You can place a widget in a position relative to another widget’s position or relative to the container.
Relative layout is recommended to be used in your application’s layout because it fits with different screen resolutions of the different devices.
As we said in relative layout widgets can be placed
- Relative to the container.
- Relative to other widgets.
Relative to the container :
The widgets are placed in position relative to their container like by setting the following properties:
- android:layout_alignParentTop|Bottom|Right|Left to true. This aligns the Top|Bottom|Right|Left side of the widget with the Top|Bottom|Right|Left side of the container.
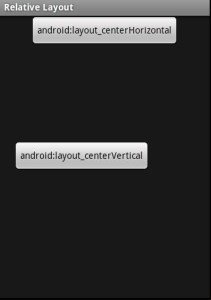
- android:layout_centerVertical: the widget should be positioned vertically in the center of the container.
- android:layout_centerHorizontal: the widget should be positioned horizontally in the center of the container.
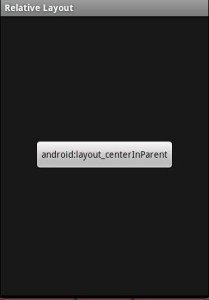
- android:layout_centerInParent: the widget should be positioned both vertically and horizontally in the middle of the container.
<?xml version="1.0" encoding="utf-8"?>
<RelativeLayout xmlns:android="https://schemas.android.com/apk/res/android"
    android:orientation="vertical"
    android:layout_width="fill_parent"
    android:layout_height="fill_parent"
    android:id="@+id/mainlayout"
    android:paddingLeft="20px"
    >

    <TextView
    android:layout_width="wrap_content"
    android:layout_height="wrap_content"
    android:text="Relative layout"
    />

    <Button
    android:layout_width="wrap_content"
    android:layout_height="wrap_content"
    android:text="android:layout_alignParentTop"
    android:layout_alignParentTop="true"
    />
    <Button
    android:layout_width="wrap_content"
    android:layout_height="wrap_content"
    android:text="android:layout_alignParentBottom"
    android:layout_alignParentBottom="true"
    />
    </RelativeLayout>
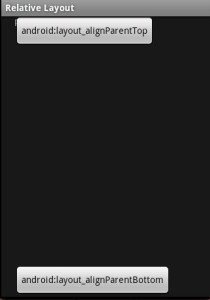
this xml gives the following layout:
<?xml version="1.0" encoding="utf-8"?>
<RelativeLayout xmlns:android="https://schemas.android.com/apk/res/android"
    android:orientation="vertical"
    android:layout_width="fill_parent"
    android:layout_height="fill_parent"
    android:id="@+id/mainlayout"
    android:paddingLeft="20px"
    >
    <Button
    android:layout_width="wrap_content"
    android:layout_height="wrap_content"
    android:text="android:layout_alignParentLeft"
    android:layout_alignParentLeft="true"
    />

</RelativeLayout>
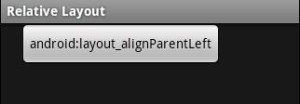
and this one:
<?xml version="1.0" encoding="utf-8"?>
<RelativeLayout xmlns:android="https://schemas.android.com/apk/res/android"
    android:orientation="vertical"
    android:layout_width="fill_parent"
    android:layout_height="fill_parent"
    android:id="@+id/mainlayout"
    android:paddingLeft="20px"
    >

    <Button
    android:layout_width="wrap_content"
    android:layout_height="wrap_content"
    android:text="android:layout_alignParentRight"
    android:layout_alignParentRight="true"
    />
</RelativeLayout>
gives this one:
this one:
<?xml version="1.0" encoding="utf-8"?>
<RelativeLayout xmlns:android="https://schemas.android.com/apk/res/android"
    android:orientation="vertical"
    android:layout_width="fill_parent"
    android:layout_height="fill_parent"
    android:id="@+id/mainlayout"
    android:paddingLeft="20px"
    >

    <Button
    android:layout_width="wrap_content"
    android:layout_height="wrap_content"
    android:text="android:layout_centerVertical"
    android:layout_centerVertical="true"
    />

    <Button
    android:layout_width="wrap_content"
    android:layout_height="wrap_content"
    android:text="android:layout_centerHorizontal"
    android:layout_centerHorizontal="true"
    />

</RelativeLayout>
gives this:
and finally this one:
<?xml version="1.0" encoding="utf-8"?>
<RelativeLayout xmlns:android="https://schemas.android.com/apk/res/android"
    android:orientation="vertical"
    android:layout_width="fill_parent"
    android:layout_height="fill_parent"
    android:id="@+id/mainlayout"
    android:paddingLeft="20px"
    >
    <Button
    android:layout_width="wrap_content"
    android:layout_height="wrap_content"
    android:text="android:layout_centerInParent"
    android:layout_centerInParent="true"
    />
</RelativeLayout>
gives this:
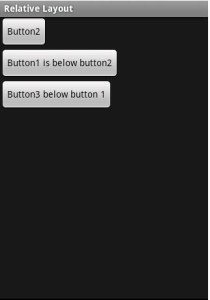
Position Relative to other widgets’ positions:
There are four properties that determine the position of the widget in relation to other widgets:
- android:layout_above: the widget should be placed above the referenced widget.
- android:layout_below: the widget should be placed below the referenced widget.
- android:layout_toRightOf: the widget should be placed to the right of the referenced widget.
- android:layout_toLeftOf: the widget should be placed above the referenced widget.
this example:
<?xml version="1.0" encoding="utf-8"?>
<RelativeLayout xmlns:android="https://schemas.android.com/apk/res/android"
    android:orientation="vertical"
    android:layout_width="fill_parent"
    android:layout_height="fill_parent"
    android:id="@+id/mainlayout"
    >
    <Button
    android:layout_width="wrap_content"
    android:layout_height="wrap_content"
    android:text="Button2"
    android:id="@+id/btn2"
    />
    <Button
    android:layout_width="wrap_content"
    android:layout_height="wrap_content"
    android:text="Button1 is below button2"
    android:layout_below="@id/btn2"
    android:id="@+id/btn1"
    />
    <Button
    android:layout_width="wrap_content"
    android:layout_height="wrap_content"
    android:text="Button3 below button 1"
    android:layout_below="@id/btn1"
    android:id="@+id/btn3"
    />

</RelativeLayout>
gives this layout:
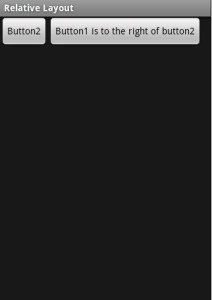
and this one:
<?xml version="1.0" encoding="utf-8"?>
<RelativeLayout xmlns:android="https://schemas.android.com/apk/res/android"
    android:orientation="vertical"
    android:layout_width="fill_parent"
    android:layout_height="fill_parent"
    android:id="@+id/mainlayout"
    >
    <Button
    android:layout_width="wrap_content"
    android:layout_height="wrap_content"
    android:text="Button2"
    android:id="@+id/btn2"
    />
    <Button
    android:layout_width="wrap_content"
    android:layout_height="wrap_content"
    android:text="Button1 is to the right of button2"
    android:layout_toRightOf="@id/btn2"
    android:id="@+id/btn1"
    />

</RelativeLayout>
gives this:
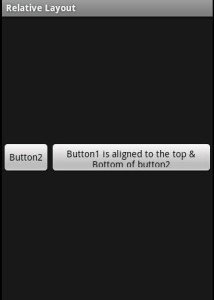
As we saw that there are properties that define the alignment of a widget relative to the container, there are also five properties that determine the position of the widget in relation to other widgets:
- android:layout_alignTop|Bottom|Right|Left: indicates that the widget’s Top|Bottom|Left|Right should be aligned with the Top|Bottom|Right|Left of the widget referenced in the property.
- android:layout_alignBaseLine: indicates that the two widget’s baselines should be aligned.
<?xml version="1.0" encoding="utf-8"?>
<RelativeLayout xmlns:android="https://schemas.android.com/apk/res/android"
    android:orientation="vertical"
    android:layout_width="fill_parent"
    android:layout_height="fill_parent"
    >
    <Button
    android:layout_width="wrap_content"
    android:layout_height="wrap_content"
    android:text="Button2"
    android:id="@+id/btn2"
    android:layout_centerVertical="true"
    />
    <Button
    android:layout_width="wrap_content"
    android:layout_height="wrap_content"
    android:text="Button1 is aligned to the top & Bottom of button2"
    android:layout_alignTop="@id/btn2"
    android:layout_toRightOf="@id/btn2"
    android:layout_alignBottom="@id/btn2"
    />

</RelativeLayout>
gives this:
Notes:
- When you reference a widget in a relative layout property, you must assure that this widget has been already defined in the layout.
- When you use the value fill_parent to assign athe height of a widget in a relative container, it could occupy all the available space so that any further controls defined in the xml file would not appear.
- When referencing another control in relative layout property, we use the notation “@id/widgetID”
Hopefully you are enjoying this tutorial series and are learning something about Android App Development.
 android