


How to make an iPhone App – Part 3: Table Views
Table views are probably the most common control in iPhone apps. If you have used the Messages app, Mail app, Twitter app, between many others, then you know what i’m talking about. You may have seen them with just text, with a tittle and a description, with an image but they are all table views.
To get started you only need to know that Table views are only one row wide, every row contains a UITableViewCell and every Cell is loaded with data that has to come from a source, the source may be any class in your project or it may come from a web service, and so on. We also will be using delegation to tell the iPhone what to do when one row is selected.
Creating the Table View in Interface Builder
Open Xcode and create a new view based application just like we did in the previous tutorial. I’m going to call mine “tableTut”.
Go to the resources folder and double click your view controller to open up Interface Builder, mine is tableViewController.xib.
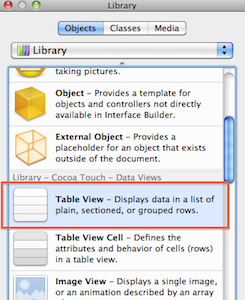
In the “Library” window, locate the Table View object and draw it to your application window.
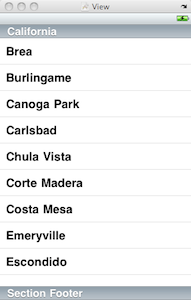
It will look like it has some data but actually it doesn’t, those rows are only demonstrative, if you save and run your app you’ll get an empty table in the simulator.
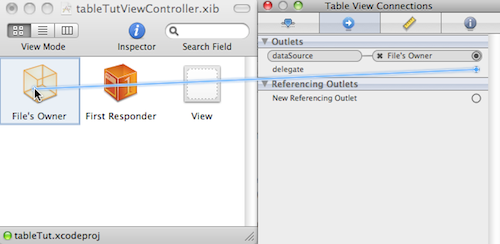
With the table selected in the app window go to the Inspector Window and click the connections tabs. There are going to be two outlets that need to be hooked up to a class in our project, so click the little circle and drag and drop it in the “Files Owner” icon in the “Document Window”.
Creating the Data Source
As i said earlier, the data source can me many things. In our case it is going to be a property list. This kind of files stores serialized objects, if this sounds to technical for you then just be satisfied to know this way is one of the easiest to read data from when populating table views.
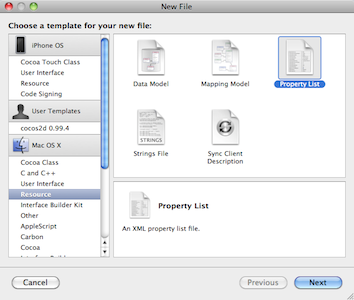
Right click the resources folder and select Add->New File…, then scroll down to the Mac OS X section and click “Resource”, in the right side of the window double click the Property List icon. Give it a name, i’m going to call mine “TPL.plist”.
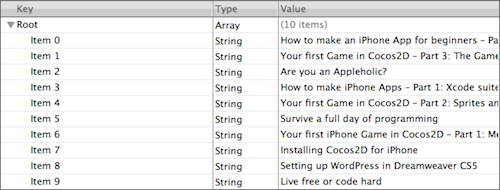
Here we are going to add al the row our table is going to have. I’m going to fill it with the tutorials i have in my site The Programmer Lifestyle.
First we need to change the type to Array:
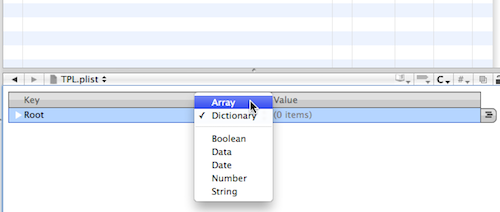
And to add a property, having selected one row, just click the small icon in the right and type the text, use string in all of them:
![]()
I added the following:
- How to make an iPhone App for beginners – Part 2: Memory and Controllers
- Your first Game in Cocos2D – Part 3: The Gameplay
- Are you an Appleholic?
- How to make iPhone Apps – Part 1: Xcode suite and Objective-C
- Your first Game in Cocos2D – Part 2: Sprites and More Transitions
- Survive a full day of programming
- Your first iPhone Game in Cocos2D – Part 1: Menus and Transitions
- Installing Cocos2D for iPhone
- Setting up WordPress in Dreamweaver CS5
- Live free or code hard
Now my List looks like this:
Populating the Table
As we said that we were going to take care of the DataSource and the Delegate in interface builder, now we need to say make that true in the code.
In the classes folder click the header of your ViewController, mine is tableTutViewController.h. And right before the opening curly brace type:
And define an array to hold the properties of the list. So now tableTutViewController.h should look:
	#import

	@interface tableTutViewController : UIViewController

	{
		NSArray * tutorials;
	}

	@end
Now we have to load the information in the property list when we open the app. In the implementation file, “tableTutViewController”, find the viewDidLoad method and uncomment it. By uncomment i mean remove the /* and */ before and after the method.
Before the [super viewDidLoad] statement create a path for the plist:
	NSString * theFile = [[NSBundle mainBundle]
					pathForResource:@"TPL" ofType:@"plist"];
And fill the tutorials array with the file contents:
tutorials = [[NSArray alloc] initWithContentsOfFile:theFile];
Now the method should look like this:
- (void)viewDidLoad {
	NSString * theFile = [[NSBundle mainBundle]
		pathForResource:@"TPL" ofType:@"plist"];
	tutorials = [[NSArray alloc] initWithContentsOfFile:theFile];
    [super viewDidLoad];
}
There are two methods that are required for loading data into the table, those are:
(NSInteger)tableView:(UITableView *)tableView numberOfRowsInSection:(NSInteger)section
(UITableViewCell *)tableView:(UITableView *)tableView cellForRowAtIndexPath:(NSIndexPath *)indexPath
To know what methods are required when you are coding things like this look in the documentation for the objects that you’re using. I looked for UITableViewDataSource and found this two methods.
We must implement both of them but i’m more interested in the second one.
After “@implementation tableTutViewController” add the first method. Just add the opening and closing curly braces and return the number of rows of the array of contents like this:
(NSInteger)tableView:(UITableView *)tableView numberOfRowsInSection:(NSInteger)section{
	return tutorials.count;
}
This will return the number of rows that the table will have. We are returning the size of “Tutorials” because it is supposed to have the same number of positions than the table of rows.
Now let’s move to the important one, the one that return the cells for each row in the table. Add the method and type the curly braces. Inside we want to create a cell, load content on it and return it, but before that, to make things more efficient we are going to dequeue the first row and add it to the bottom.
Confused?.
Apple recommends to reuse cells. This means that when we scroll down our table, the cell that leaves the screen we are going to take it an add it to the bottom of the screen with the data that follows in the list, that way we give the effect of scrolling through many cells without loading all of them in memory.
In order to do so we need to type this inside the method:
UITableViewCell * RowContent =
	[tableView dequeueReusableCellWithIdentifier:@"MyCell"];
This @”MyCell” is just a tag or and id to identify our cell
Now if the cell is null, we create a new one:
if (RowContent == nil){
	RowContent = [[UITableViewCell alloc]
			initWithStyle:UITableViewCellStyleDefault
			reuseIdentifier:@"MyCell"];
}
Then we load the content:
RowContent.textLabel.text = [tutorials objectAtIndex:indexPath.row];
And last we return the cell:
return RowContent;
If you did everything right both methods should look like this:
-(NSInteger)tableView:(UITableView *)tableView numberOfRowsInSection:(NSInteger)section{
	return tutorials.count;
}

-(UITableViewCell *)tableView:(UITableView *)tableView cellForRowAtIndexPath:(NSIndexPath *)indexPath{

	UITableViewCell * RowContent =
	[tableView dequeueReusableCellWithIdentifier:@"MyCell"];

	if (RowContent == nil){
		RowContent = [[UITableViewCell alloc]
				initWithStyle:UITableViewCellStyleDefault
				reuseIdentifier:@"MyCell"];
	}

	RowContent.textLabel.text = [tutorials objectAtIndex:indexPath.row];

	return RowContent;

}
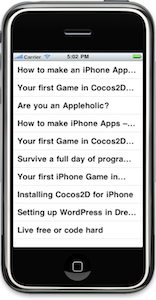
Build and run the app and the table should appear:
I didn’t add enough rows in the plist to let the table scroll, but no problem, just add a few more to the file and you’ll make it scroll. Thats your homework.
Now select one row. Nothing will happen. We need to add a new view and switch, but that is going to be part of the next tutorial.
Conclusion
You have learned how to populate a table view from a file. In the next tutorial we are going to add a new view so when you tab a row the table will move to a side to give way to the new view.
Stay hooked to the series!
 apps
apps