


iOS Advanced Programming: Event Kit Framework
In today’s tutorial we are going to cover the Event Kit Framework and how to add an event to the calendar.
The Event Kit Framework is the way Apple wants us to display or create a calendar entry. With this they are not trying to replace the calendar app, they are trying to give us a way to create an appointment from our app and add it to the calendar app.
To explain this I am going to create a calendar event programmatically. The only problem is that we are not going to be able to test it in the simulator because it doesn’t have a calendar app. To test it you will have to pay $99 to Apple.
Open up Xcode and create a View-Based Application for iPhone. I’m going to call mine “EventApp”.
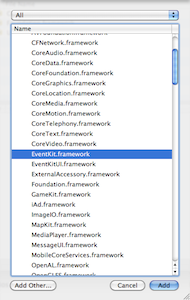
Adding the framework
The Event framework is not added by default. You have to right click over the “Frameworks” folder in “Groups and Files” and select Add->Existing Frameworks then find EventKit.framework and click the “Add” button.
Writing the Code
Now in the EventAppViewController.m import EventKit.
#import
Now create a method that will be called when the user touches the “Create event” button that we are going to add later to our interface.
-(IBAction) newEvent {

}
Remember that it must also be added to the .h file as well.
First add the object that is going to give us access to the events database, an EKEventStore.
EKEventStore *eventDB = [[EKEventStore alloc] init];
Then we create a new event object:
EKEvent *myEvent = [EKEvent eventWithEventStore:eventDB];
Now we set some basic properties:
myEvent.title     = @"New Event";
myEvent.startDate = [[NSDate alloc] init];
myEvent.endDate   = [[NSDate alloc] init];
myEvent.allDay = YES;
I’m setting the start date and end date the same because it is not going to last more than one day and later I it will be an all-day event.
Next we must specify a calendar for that event. I am going to set it to the default calendar.
[myEvent setCalendar:[eventDB defaultCalendarForNewEvents]];
Before we save the event we need to check for errors:
NSError *err;
[eventDB saveEvent:myEvent span:EKSpanThisEvent error:&err];
Now we test to see if there are any errors. If there are no errors we tell the user that the event was successfully created.
if (err == noErr) {
	UIAlertView *alert = [[UIAlertView alloc]
		initWithTitle:@"Event Created"
		message:@"Yay!"
		delegate:nil
		cancelButtonTitle:@"Okay"
		otherButtonTitles:nil];
	[alert show];
	[alert release];
}
Apple strongly recommends that you notify the user that the event was created. If you create events in the background and you don’t tell the user, Apple will probably reject your app from the App Store, so it is always a good idea to do this.
And last we release the objects:
[startDate release];
[endDate release];
[eventStore release];
The final look of the method should be this:
-(IBAction) newEvent {

	EKEventStore *eventDB = [[EKEventStore alloc] init];

    EKEvent *myEvent  = [EKEvent eventWithEventStore:eventDB];

	myEvent.title     = @"New Event";
    myEvent.startDate = [[NSDate alloc] init];
    myEvent.endDate   = [[NSDate alloc] init];
	myEvent.allDay = YES;

    [myEvent setCalendar:[eventDB defaultCalendarForNewEvents]];

    NSError *err;

    [eventDB saveEvent:myEvent span:EKSpanThisEvent error:&err];

	if (err == noErr) {
		UIAlertView *alert = [[UIAlertView alloc]
			initWithTitle:@"Event Created"
			message:@"Yay!?"
			delegate:nil
			cancelButtonTitle:@"Okay"
			otherButtonTitles:nil];
		[alert show];
		[alert release];
	}
}
Now let’s go to interface builder to create the GUI for our App.
Building the Interface
Open EventAppViewController.xib in the Resources folder.
Add a Round Rect Button and put some text in it.

Then connect it to the newEvent method.
Save and quit Interface Builder and we are done.
Conclusion
That was easy, wasn’t it?
Apple also included a UI kit for creating events that looks exactly like the calendar app, but it is so easy that i don’t need to explain it, i’m going to leave it to you as homework.
See you in the next tutorial!
 event
event