


iOS Development Tutorial Series: TableViews
 Hello again, today we will learn about UITableViews and NSArrays, but before we start I need everyone who reads these tutorials to vote on the poll below, since it will determine how the next tutorials will be presented. Since Apple released the new version of Xcode (Xcode 4) I need to know whether we should use Xcode 4 or Xcode 3 for the tutorials. Xcode 4 does cost $5, but I think it’s well worth the price (in my opinion). You can find Xcode 4 in the Mac App Store.
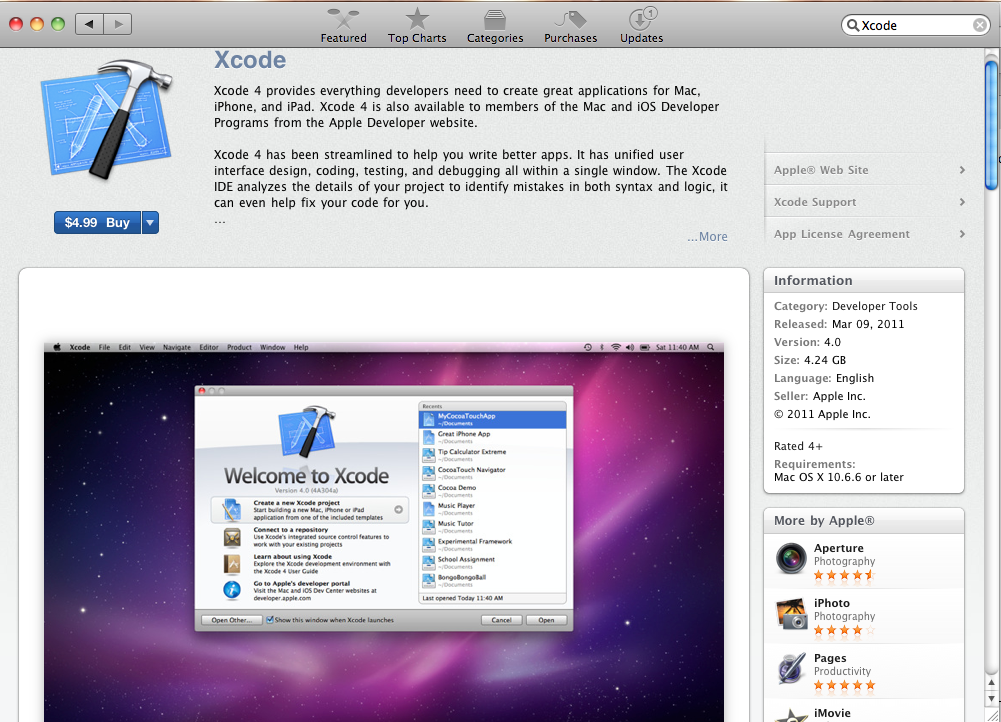
If you don’t vote you will have no room to complain about which one was chosen. But for today we will just use Xcode 3.
[polldaddy poll=4717765]
Lets get started. A table view is an object that display information by sections and cells in a scrollable window.
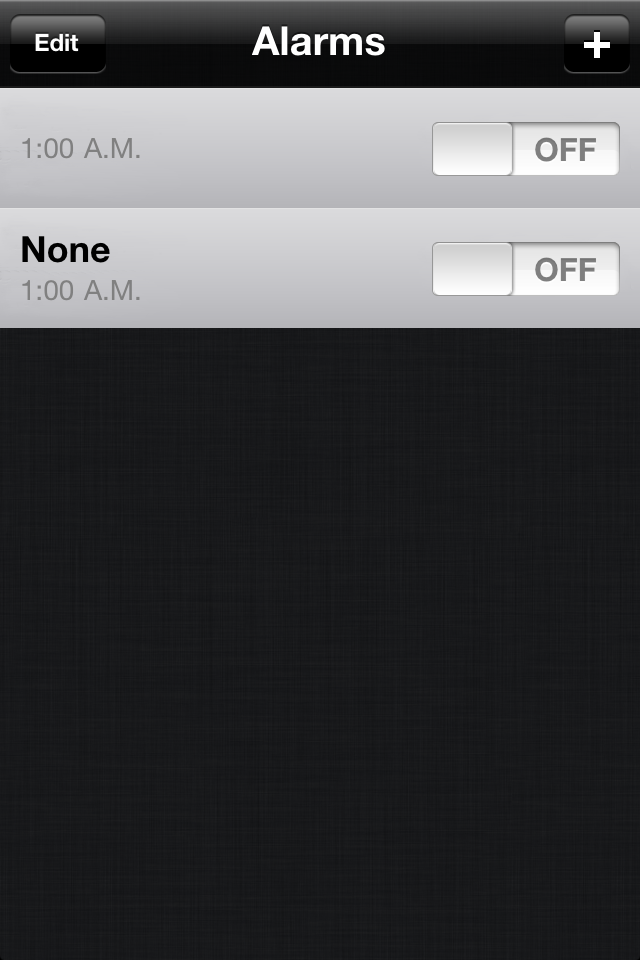
Here are some examples of table views:


So what is a table view exactly? Before I explain that, I must explain what an array is.
An array is an object that holds other objects in a certain order. For example an array could be 10 NSStrings in a certain order or no order at all. Essentially, it’s a box to hold objects.
Does that make sense? It’s an easy concept.
So, lets get back to table views. A tableview is essentially a visual object of an NSArray. In a table view, you can see the objects that were stored in the array and take an action upon that data that is presented. For example, in the iPod app you would tap a table view cell (a cell is a single row of data in the table) and it would start playing whatever you tapped on.
Obviously there is more complexity to both of these objects, but for now, that’s good.
Now that we have laid some ground, lets get started with the tutorial.
1. Create a new view-based project named “TableView”
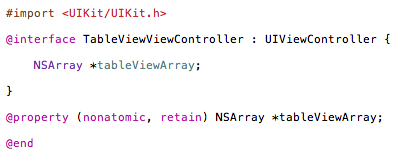
2. Go to the header file (TableViewController.h).
Since a table view is a visual object that display objects in an array we will need to create an array so that we can populate the table view.
3. In the header file declare this:
NSArray *tableViewArray;
4. We will also need to create a property for the NSArray so that we can set the data that will be in the array. I will explain in further detail what a property is, but for now, that will do. Outside the curly brace, type:
@property (nonatomic, retain) NSArray *tableViewArray;
We’re done in the header. Lets move into interface builder.
5. Open the TableViewViewController.xib file
The only thing we are going to need for this tutorial is a UITableView
6. Drag a UITableView onto your main view.
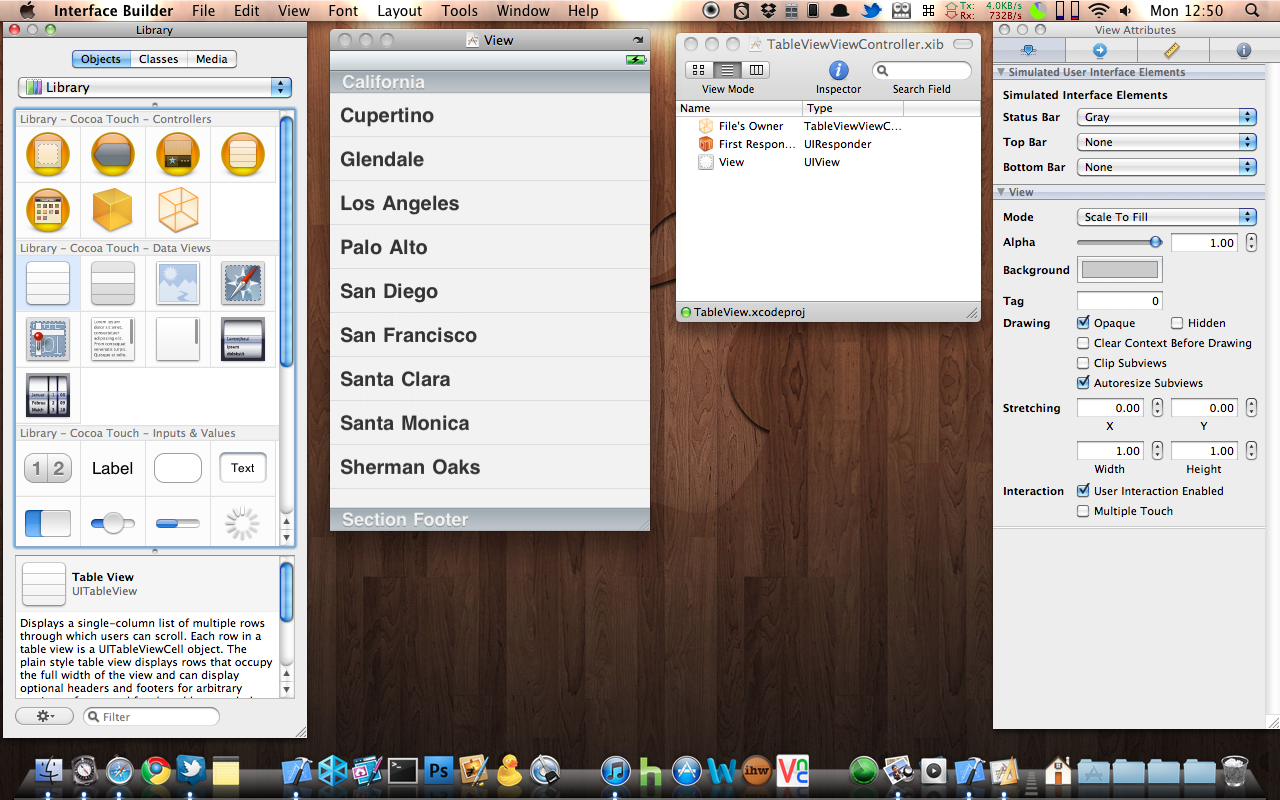
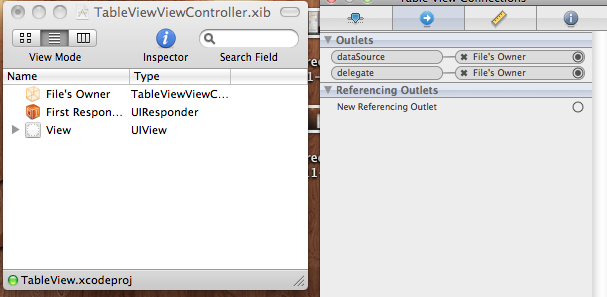
That’s all we need for our view, but our table view has no way of communicating between our controller (header and implementation files) and our view. So we need to link two things up from our table view to our files owner.
7. Click the table view and then click the connections tab. Now drag the datasource and delegate to the files owner.

Now we need to go back to the header file and do some more work.
8. Behind the UIViewController line type:
<UITableViewDelegate, UITableViewDataSource>
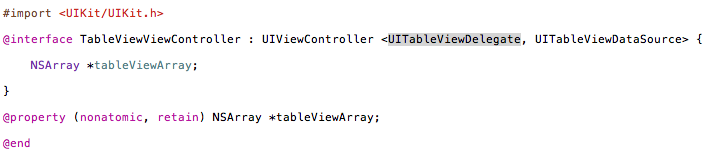
What we are doing here is making our viewcontroller (TableViewViewController) the delegate of UITableViewDelegate and UITableViewDataSource. Don’t worry about what a delegate is, we will cover it in a later tutorial.
You will also need to make a synthesize statement in your implementation file.
9. In your TableViewViewController.m file type:
@synthesize tableViewArray;

10. Scroll down through all the comments until you find the method named -(void)viewDidLoad. Once you find it uncomment it by deleting the “/*” and “*/” before and after the method.

Now what we need to do is create an NSArray and fill it with objects and then set the NSArray to the NSArray we declared in the header file.
10. Below the [super viewDidLoad]; type:
NSArray *array = [[NSArray alloc] initWithObjects:@”Apple”,@”Microsoft”,@”Samsung”,@”Motorola”,nil];
self.tableViewArray = array;
[array release];

What we are doing here is creating an NSArray and setting the objects of it to NSStrings (Apple, Microsoft, Samsung). As you can see at the end of our objects we say nil. What does that even mean? Well, nil essentitally means zero which tells the NSArray that is the end of the list of objects. If you don’t put nil at the end of the array it will crash your app, because when the NSArray gets created is puts those NSStrings in the array but it doesn’t know when to stop loading information. That is fairly simple, right?
Then we are setting the new NSArray we created to the one we declared in the header.
In the last line we release the newly created array because it is no longer needed.
So, now we have our array filled up with some content, but if you were to run your app nothing would show because the table view still doesn’t have a connection to the array itself. We need to make that connection.
11. Copy this method anywhere in your implementation file:
– (NSInteger)tableView:(UITableView *)tableView numberOfRowsInSection:(NSInteger)section
What this method does is, it sends a message to the datasource that you plugged in on interface builder asking for the number of rows that will appear in the table view. Since we typically wouldn’t know how many rows in the table view we would need we must set the number to the number of objects in our array.
12. In the new method type:
return [tableViewArray count];
![]()
Before we talk about the entire line of code, we need to talk about the return statement. Return sends the value that you request to the method return type. For example, the return type of this method is an NSInteger and what we are doing in the entire line of code is sending the number of entries in the tableViewArray to the method return type, which is an NSInteger.
13. Copy this below your new method.
– (UITableViewCell *)tableView:(UITableView *)tableView cellForRowAtIndexPath:(NSIndexPath *)indexPath
This method will get called just like the other one, but this one will get called every time we need a new cell in the table view. For example, since we returned the count of the array in the last method, this new method will get called by the number of items in the table view.
14. In the new method type:
UITableViewCell *cell = [tableView dequeueReusableCellWithIdentifier:@”SimpleTableIdentifier”];
if (cell == nil) {
cell = [[[UITableViewCell alloc] initWithStyle:UITableViewCellStyleSubtitle reuseIdentifier:@”SimpleTableIdentifier”]autorelease];
}
cell.textLabel.text = [tableViewArray objectAtIndex:indexPath.row];
return cell;

Here we are creating a new object called UITableViewCell. This is the object that looks like a row in the table view. We won’t worry about the if statement for now, but you just need to know that those top four lines of code are the lines that are safely creating the table view cell.
In the line below the if statement we are setting the text property of the cell to the object that is at the same index in the array as it is in the table view. For example, since the table view is essentially a visual object of the array, it will be in the same order as the array. So when our method gets called it will start at index 0 and it will also call the object at index 0 in the array.
Since our method return type is a UITableViewCell we will return the cell that we created and set the text to the method return type.
Now if you were to run your app everything in your array would show up in your table view.
15. Copy this method below your UITableViewCell method
– (void)tableView:(UITableView *)tableView didSelectRowAtIndexPath:(NSIndexPath *)indexPath
This method gets called when a cell in the table view gets tapped. That’s cool, but how do we know what cell was tapped? Any guesses?
We use the index path.
16. Type this in the new method:
NSString *message = [NSString stringWithFormat:@”You selected %@”,[tableViewArray objectAtIndex:indexPath.row]];
UIAlertView *alert = [[UIAlertView alloc] initWithTitle:@”Alert”
message: message delegate:self cancelButtonTitle:@”Close” otherButtonTitles:nil];
[alert show];
[alert release];

Here we are creating an NSString and setting the text to the object in the array that is at the same index that the method has. Then we are creating an alert and setting the message value to the message string and the cancel button as Close. We’ve done this before you know how it works.
We are done with our code! Lets run it and see how it works.

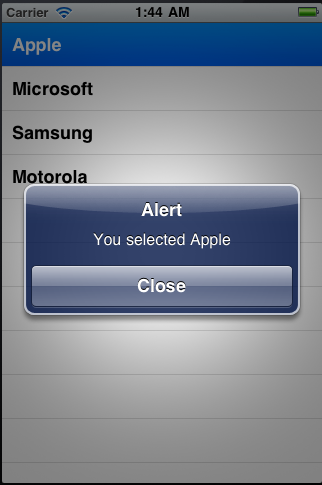
That looks awesome!
The concept of table views itself isn’t very complicated, but what may stump you is: the indexes. If you understand the index concept that I taught above the you’re golden!
That’s it for this tutorial!
You can download the code for this tutorial here.
Please vote in the poll at the top of the page so that I will get unbiased and fair results.
If you enjoy my tutorials, you can support me by buying my app from the App Store (here). Thanks!
 Derek
Derek 