


New In iPhone 3.0 Tutorial Series, Part 1: Shake To Undo/Redo, NSUndoManager
Happy iPhone 3.0 release day!
To celebrate the release of iPhone 3.0 and, with it, the freedom of being able to talk about things in the 3.0 SDK without violating the NDA, I’m pleased to bring you the first in a series of New In iPhone 3.0 programming tutorials.
This first tutorial demonstrates how to add shake-to-undo/redo capabilities to an application.
NSUndoManager
Undo/redo capabilities are provided by the NSUndoManager class. The class, documented here, works by keeping a stack of messages that, if sent, would serially undo the last action, the penultimate action, and on back until arriving at the initial state.
Let’s use an example to illustrate how this works: our city, concerned with a perceived increase in the number of trucks plying our streets, has commissioned a census. City workers will tally truck traffic using an iPhone app. See a truck, tap a button. Oops! Mistook that Subaru Forester for a truck? Shake to undo.
We’ll start with working code that lacks undo/redo and add those capabilities. Grab the code to follow along:
Source/GitHub
The code for this tutorial is available on GitHub. To download a copy for yourself, clone the repository:
- Open a terminal and change to the directory where you want the code
- Clone the repo by typing git clone git://github.com/dcgrigsby/TallyTrucks.git
I’ve made two separate commits to the repository — an initial commit without undo/redo capabilities, and a second one with undo/redo. If you’re following along step-by-step you’ll want to revert to the earlier commit. From the source directory:
- Type git checkout 2d3a8136f43a1bba5183b1160c165aea24b705f2
Orientation
TallyTrucks is about as simple of an application as it’s possible to construct. The UI contains a single view with a single large button that both shows the tally of trucks and also provides the mechanism for advancing the count.
Look in TallyTrucksViewController.m: like all Objective-C based apps, we’re sending messages. Send a addATruck message to move the ticker forward; send a removeATruck message to move the ticker back.
Let’s think about this in NSUndoManager terms. In laws-of-physics terms: for every action we need an equal and opposite reaction. When the user taps the button that triggers addATruck we’d need to execute removeATruck to undo that action.
Let’s add an undo manager to our project and wire up the actions described in the previous paragraph:
Adding NSUndoManager
We’ll add our undo manager as an instance variable to our view controller class.
Update the TallyTrucksViewController.h. Changes are bold:
#import <UIKit/UIKit.h>l

@interface TallyTrucksViewController : UIViewController {
	IBOutlet UIButton *button;
	int i;
	NSUndoManager *undoManager;
}

@property (nonatomic,retain) NSUndoManager *undoManager;

-(IBAction)buttonPressed;
-(void)addATruck;
-(void)removeATruck;
-(void)updateTitle;

@end
There are two changes to TallyTrucksViewController.m:
First, synthesize the property we declared in the .h file. Add…
@synthesize undoManager;
…after the @implementation TallyTrucksViewController statement.
Second, update viewDidLoad and dealloc. Changes are bold:
- (void)viewDidLoad {
	[super viewDidLoad];
	i = 0;
	undoManager = [[NSUndoManager alloc] init];
}

- (void)dealloc {
	[undoManager release];
	[super dealloc];
}
Equal And Opposite Reaction
Now that we’ve added our NSUndoManager instance, we’ll want to start pairing our actions with their equal and opposite undo actions.
Undo actions come in two flavors: registerUndoWithTarget:selector:object: and prepareWithInvocationTarget. The former sends a message with a single argument. The latter uses an NSInvocation — used for storing and forwarding messages between objects — and can have an arbitrary number of arguments. Our addATruck and removeATruck methods don’t take any arguments, so we’ll use the invocation approach.
Update addATruck and removeATruck in TallyTrucksViewController.m. Changes are bold:
-(void)addATruck {
	i += 1;
	[[undoManager prepareWithInvocationTarget:self] removeATruck];
	[self updateTitle];
}

-(void)removeATruck {
	i -= 1;
	[[undoManager prepareWithInvocationTarget:self] addATruck];
	[self updateTitle];
}
Now, when a user adds a truck a stored remove a truck operation is at the top of the undo stack. Remove a truck message has the same pattern, but the opposite result.
Redo
Earlier I said that NSUndoManager keeps a stack of undo actions. More precisely, there are actually two stacks: one for undoing actions and another for re-doing the same actions. When you undo some action the messages that originally made up that action are placed on the redo stack. Redo is, effectively, undoing an undo. Fortunately, as a programmer, all of this is handled by the undo manager, so you don’t have to worry about the details.
Shake
Now that we’ve gotten the undo manager wired up you’ll be tempted to fire up the app and test it out. You’ll be disappointed. Having the undo manager is necessary but not sufficient. We need to connect it to the phone’s shake-detection mechanism.
A boolean applicationSupportsShakeToEdit property was added to the UIApplication class in the 3.0 SDK. We’ll set it in the app’s delegate.
Update applicationDidFinishLaunching in TallyTrucksAppDelegate.m. Changes are bold:
- (void)applicationDidFinishLaunching:(UIApplication *)application {
	application.applicationSupportsShakeToEdit = YES;
	[window addSubview:viewController.view];
	[window makeKeyAndVisible];
}
You have to be the first responder to receive shake events. We’ll need to update our view controller to both indicate that it can become the first responder, then actually become the first responder and, finally, resign being first responder when the view disappears.
Add canBecomeFirstResponder, viewDidAppear:, and viewWillDisappear: methods to TallyTrucksViewController.m:
-(BOOL)canBecomeFirstResponder {
	return YES;
}

-(void)viewDidAppear:(BOOL)animated {
	[super viewDidAppear:animated];
	[self becomeFirstResponder];
}

- (void)viewWillDisappear:(BOOL)animated {
	[self resignFirstResponder];
	[super viewWillDisappear:animated];
}
The app now has undo/redo capabilities. Build the project and check it out! (You’ll most likely be testing this on the simulator. You can simulate a shake gesture with the Hardware file-menu item of the same name.)
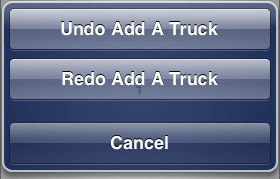
Better Undo Labeling
In its current form, the undo message is unadorned. It simply says “Undo” and “Redo” We’ll make on final change and update the code so that the message says, “Undo Add A Truck” and “Redo Add A Truck.”
Update the addATruck method in TallyTrucksViewController.m. Changes are bold:
-(void)addATruck {
	i += 1;
	[[undoManager prepareWithInvocationTarget:self] removeATruck];
	[undoManager setActionName:@"Add A Truck"];
	[self updateTitle];
}
Conclusion
This covers the basics. When implementing it in your own projects, be cautious about hanging onto first responder too long. For more complex undo scenarios — you may want to wrap your setActionName calls in an if (![undoManager isUndoing]) block.