


Android App Development – Using Android resources part 1: String Resources
Resources in Android are files stored under the res directory of your project. Resources can be physical files (Audio, video, images, text, etc…) or xml files that declare some values to use in your application.
Why use Resources:
- The resources are bound to the application in a way that you can change them without needing to change the source code or recompile the application.
- The Android Generates an ID for each resource file so you can access them directly and easily. All the resources IDs are added to the R.Java file.
- When you use XML resource files, Android pareses these files automatically so you can reference values defined in them directly with no extra effort.
- Using resources is very useful in Localization and Internationalization of the application in case you develop multilingual applications. This includes not just the labels but it can include alignment, directions images or any kind of files.
Types of resources:
- Strings, colors, arrays, dimensions. Defined in res/values/ directory. Using them is very useful in Localization and Internationalization.
- Images put in res/drawable directory. You can put all the images or icons you need in your application.
- Animations, defined in res/anime/ directory. You can define animations that for example correspond to a button click.
- XML, defined in res/xml/ directory for xml files containing your custom data.
- Layout resources, defined in res/layout/ for declaring the views that construct the user interface of the activities.
String Resources:
Android offers three types of string resources:
- Plain Strings.
- String formats.
- Styled texts.
Plain string resources can be declared in res/values/strings.xml
If you create an Android application [for example call it HelloAndroid] and just before adding anything, browse to res/values/strings.xml it will be like this:
    Hello World, HelloAndroid!
    HelloAndroid
This is a pretty basic example of Plain text resources. The resource with name=”app_name” is the name of the application that appears when you deploy the application to the phone, it’s referenced in the AndroidManifest.xml file in the application tab. You can change it as you want.
Now let’s add two entries in the file to see how can we use plain text resources within the application.
This is referenced from the res/layout/main.xml
This is referenced from the code
The first string will be the text of a text view defined in res/layout/main.xml file
See that to reference the first string we use the @string/[Resource Name] convention.
The second resource will be referenced from the code file of the activity like this
TextView txtHeader2=(TextView)findViewById(R.id.txtHeader2);
txtHeader2.setText(getString(R.string.plainResource2));
if you open R.java file of your project you will find that Android has generated a class called string with members referencing to your string resources:
public static final class string {
        public static final int app_name=0x7f040001;
        public static final int hello=0x7f040000;
        public static final int plainResource1=0x7f040002;
        public static final int plainResource2=0x7f040003;
    }
Also notice the way you access the string resources in Android, you don’t open the strings.xml file and parse it to extract the values you want to reference- instead you access them through the R.string class defined in R.Java and Android does the rest for you.
Also another interesting feature is that you can define your own resources file, go to res/values/ directory, right click>New>File and call the file for example CustomStrings
You will see something like this:
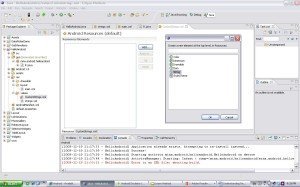
You can define resources manually by choosing the CustomStrings.xml tab or by using clicking Add button and adding the name and the value of the resource.
I will add a resource with the name CustomString and value this is a custom string and reference them from the layout like this:
<textview android:id="@+id/txtHeader1" android:layout_height="wrap_content" android:layout_width="fill_parent" android:text="@string/CustomString">
Or from the code like this:
TextView txtHeader3=(TextView)findViewById(R.id.txtHeader3);
txtHeader3.setText(getString(R.string.CustomString));
String format Resources:
the dalvik vm offers string formats whih provide placeholders representing data to be replaced at runtime by variables
an example of a string format resource is:
This is resource for %1$s
the %1$s is the place holder that would be replaced by a variable string.
and from your code you can use it like this:
//String format resource
        TextView txtHeader4=(TextView)findViewById(R.id.txtHeader4);
        String strFormat=getString(R.string.StringFormat);
        String header=String.format(strFormat, "Giving an example of string format resource");
        txtHeader4.setText(header);
and the text view will have a text equal to This is resource for Giving an example of string format resource.
Styled text Resources:
You can use string resources styled with these three HTML tags:
- <b>.
- <u>.
- <i>.
You can define the a string as follows:
This is an <u>example</u> of <i>Styled</i> <b>Resources</b>
And use it from the code as this:
TextView txtHeader5=(TextView)findViewById(R.id.txtHeader5);
txtHeader5.setText(R.string.StyledResource);
notice that we use setText() method by calling the string resource directly.
if we use the getString() method it will display the string without styling
we can use the HTML styled text also by using spanned class.
Spanned textSpan = android.text.Html.fromHtml(htmlTaggedString);
//Set it in a text view
textView.setText(textSpan);
In this post we saw how Android provides three types of string resources: Plain strings, String formats which provide place holders to be replaced by variables in runtime and Styled text resources which provide styling with three standard HTML tags.
 android